Flutter 프로젝트를 디버깅할 때, 올바른 디버그 설정을 통해 더 효율적으로 개발할 수 있습니다. 이번 글에서는 VSCode에서 Flutter 디버그 설정을 단계별로 설명하겠습니다.
1. launch.json 파일 생성하기
Flutter 프로젝트의 디버그 설정은 launch.json 파일에 저장됩니다. 이 파일을 통해 어떤 파일을 실행할지, 어떤 디버그 모드로 실행할지 등을 지정할 수 있습니다.
자동 launch.json 파일 생성 방법
Flutter 프로젝트에서 main.dart 파일을 열고 F5 (또는 디버그 > 시작)를 눌러 디버깅을 시작하면, VSCode가 자동으로 launch.json 파일을 생성합니다.
수동 launch.json 파일 생성 방법
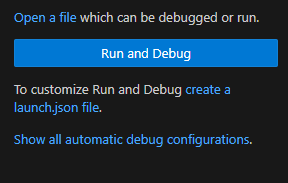
VSCode에서 RUN AND DEBUG를 엽니다. Ctrl + Shift + D (macOS의 경우 Cmd + Shift + D)를 눌러 RUN AND DEBUG 를 열 수 있습니다.
![RUN AND DEBUG]()
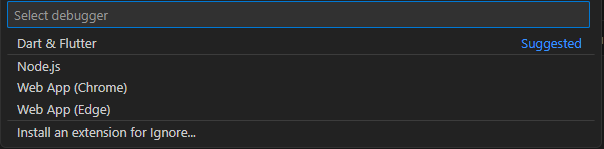
create a launch.json file를 클릭 명령어 창을 실행 하고 Dart & Flutter를 선택 하여 기본 설정 파일을 생성 합니다.
![RUN AND DEBUG]()
- 파일을 생성하면
.vscode/launch.json이 생성 되며 기본 json은 아래와 같이 생성 됩니다.1 2 3 4 5 6 7 8 9 10 11 12 13 14 15 16 17 18 19 20 21 22 23 24 25
{ // Use IntelliSense to learn about possible attributes. // Hover to view descriptions of existing attributes. // For more information, visit: https://go.microsoft.com/fwlink/?linkid=830387 "version": "0.2.0", "configurations": [ { "name": "flutter_application_1", "request": "launch", "type": "dart" }, { "name": "flutter_application_1 (profile mode)", "request": "launch", "type": "dart", "flutterMode": "profile" }, { "name": "flutter_application_1 (release mode)", "request": "launch", "type": "dart", "flutterMode": "release" }, ] }
- 실제 디바이스 또는 에뮬레이터에서 실행하기 위해서는
launch.json파일에 아래 내용을 참고 하여 작성 합니다.1 2 3 4 5 6 7 8 9 10 11 12 13
{ "name": "Android Device", "request": "launch", "type": "dart", "args" : ["-d", "connected devices"] // 연결된 디바이스 정보 }, { "name": "Android 9 (API 28) (Pixel 2)", "request": "launch", "type": "dart", "args" : ["-d", "emulator-5554"] },
현재 연결된 디바이스 정보를 확인하고 싶다면 아래 명령어를 통해 확인 할 수 있습니다.
1
flutter devices
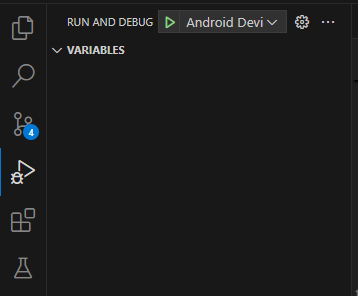
- 위 설정까 모두 적용 되었다면 RUN AND DEBUG 에
launch.json에 작성된 name이 노출됩니다.
![RUN AND DEBUG]()
디버그 실행하기
- 디버그 모드 실행: 디버그 모드를 시작하려면 F5 키를 누르거나, 왼쪽 사이드바의 디버그 아이콘을 클릭한 후 “RUN AND DEBUG”을 선택하면 됩니다.
- 디바이스 선택: Flutter 디버깅은 실제 디바이스 또는 에뮬레이터에서 실행할 수 있습니다. 하단의 상태바에서 디바이스를 선택하고 디버그 모드를 시작할 수 있습니다.
유용한 디버깅 명령
- Hot Reload: 디버깅 중에 코드 변경 사항을 바로 반영하려면 Hot Reload 버튼(번개 모양)을 누르거나, Ctrl + Shift + \ (macOS에서는 Cmd + Shift + )를 누릅니다.
- Hot Restart: 앱을 다시 시작하려면 Hot Restart 버튼(재생 화살표 모양)을 클릭합니다.
에뮬레이터 또는 디바이스 설정
- Flutter 디버깅을 위해서는 에뮬레이터나 실제 디바이스가 연결되어 있어야 합니다.
- 에뮬레이터 시작: VSCode 하단의 Flutter 디바이스 표시줄에서 사용할 수 있는 에뮬레이터를 선택하고, Start iOS Simulator 또는 Start Android Emulator를 선택합니다. 실제 디바이스 연결: USB로 디바이스를 연결한 후 flutter devices 명령을 실행해 디바이스를 확인합니다.
최종 launch.json
1
2
3
4
5
6
7
8
9
10
11
12
13
14
15
16
17
18
19
20
21
22
23
24
25
26
27
28
29
30
31
32
33
34
35
36
37
{
    // Use IntelliSense to learn about possible attributes.
    // Hover to view descriptions of existing attributes.
    // For more information, visit: https://go.microsoft.com/fwlink/?linkid=830387
    "version": "0.2.0",
    "configurations": [
        {
            "name": "flutter_application_1",
            "request": "launch",
            "type": "dart"
        },
        {
            "name": "flutter_application_1 (profile mode)",
            "request": "launch",
            "type": "dart",
            "flutterMode": "profile"
        },
        {
            "name": "flutter_application_1 (release mode)",
            "request": "launch",
            "type": "dart",
            "flutterMode": "release"
        },
                {
            "name": "Android Device",
            "request": "launch",
            "type": "dart",
            "args" : ["-d", "connected devices"] // 연결된 디바이스 정보
        },
        {
            "name": "Android 9 (API 28) (Pixel 2)",
            "request": "launch",
            "type": "dart",
            "args" : ["-d", "emulator-5554"]
        },
    ]
}